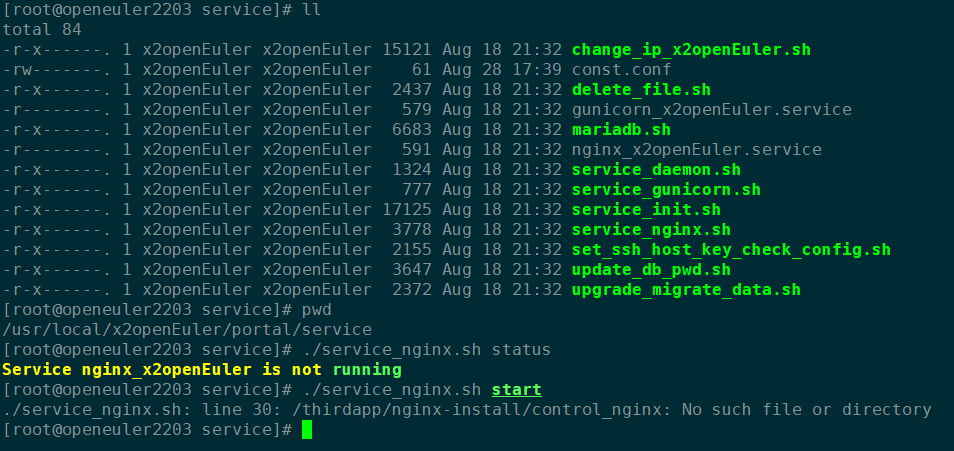
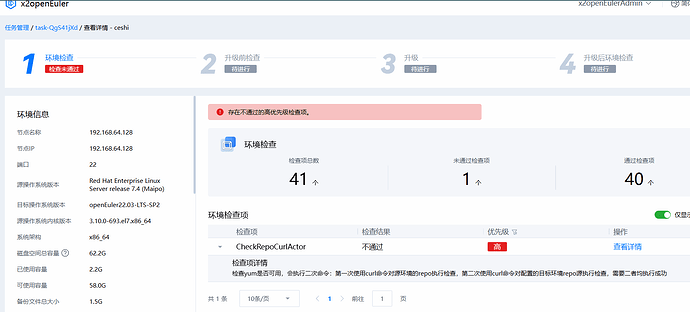
我看到那个service_nginx.sh脚本里面的启动路径出错,是我哪里操作有误吗?麻烦大家帮看一下 ::
1、系统版本

2、软件版本

3、安装x2openeuler最后一步的提示

4、手工启动nginx出错
![]()
![]()
5、service_nginx.sh内容
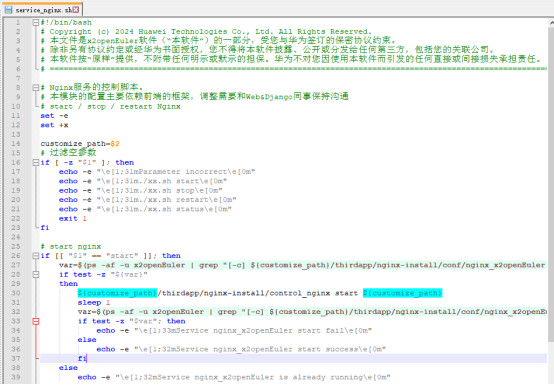
建议先根据提示信息看看服务状态
服务状态:systemctl status nginx_x2openEuler.service
以上方法都不行,放弃治疗了,用Centos7.4按手册安装,一切正常。感谢各位的回复。
求分享一个安装x2openEuler-3.0.0的步骤
以下是抄录官网的迁移实战一,x2openEuler服务端版本为最新20240818版本,后续安装输出的是20240125旧日志,与实际日志输出有可能不一致。
Centos7.4(最小化)安装x2openEuler
x2openEuler下载地址:
https://repo.oepkgs.net/openEuler/rpm/openEuler-20.03-LTS-SP1/contrib/x2openEuler/x86_64/Packages/
1、闭防火墙和selinux
systemctl stop firewalld
systemctl disable firewalld
sed -i s#SELINUX=enforcing#SELINUX=disabled#g /etc/selinux/config
setenforce 0
2、设置语言编码为en_US.utf8
echo “export LANG=en_US.utf8” >> /etc/profile
source /etc/profile
date
3、安装常用软件
yum install -y wget lrzsz vim bash-completion net-tools
4、配置repo源
cd /etc/yum.repos.d/
mkdir bak
mv *.repo bak/
wget -O /etc/yum.repos.d/CentOS-Base.repo https://mirrors.huaweicloud.com/repository/conf/CentOS-7-anon.repo
yum clean all && yum makecache
5、下载相关软件包
wget x2openEuler-core-3.0.0-20240818.x86_64.rpm
6、安装x2openEuler-core包
yum install -y /root/x2openEuler-core-3.0.0-20240818.x86_64.rpm
7、服务初始化
[root@node11 ~]# cd /usr/local/x2openEuler/portal/service/
[root@node11 service]# ll
total 84
-rwxr-x—. 1 root root 14616 Jan 25 20:30 change_ip_x2openEuler.sh
-rwxr-x—. 1 root root 57 Jan 25 20:30 const.conf
-rwxr-x—. 1 root root 1897 Jan 25 20:30 delete_file.sh
-rwxr-x—. 1 root root 579 Jan 25 20:30 gunicorn_x2openEuler.service
-rwxr-x—. 1 root root 6143 Jan 25 20:30 mariadb.sh
-rwxr-x—. 1 root root 591 Jan 25 20:30 nginx_x2openEuler.service
-rwxr-x—. 1 root root 784 Jan 25 20:30 service_daemon.sh
-rwxr-x—. 1 root root 237 Jan 25 20:30 service_gunicorn.sh
-rwxr-x—. 1 root root 16497 Jan 25 20:30 service_init.sh
-rwxr-x—. 1 root root 3237 Jan 25 20:30 service_nginx.sh
-rwxr-x—. 1 root root 1614 Jan 25 20:30 set_ssh_host_key_check_config.sh
-rwxr-x—. 1 root root 3107 Jan 25 20:30 update_db_pwd.sh
-rwxr-x—. 1 root root 828 Jan 25 20:30 upgrade_migrate_data.sh
[root@node11 service]# bash service_init.sh
#-------------------------------开始安装mariadb------------------------------
Start the MariaDB custom configuration for the use of the x2openEuler tool.
Has MariaDB been installed on the server and can be used properly? [Y/n] (default: n)
服务器上是否已经安装了mariadb并且是否能正常使用,没有安装mariadb,此处输入n,默认为n,直接回车即可。
Created symlink from /etc/systemd/system/multi-user.target.wants/mariadb.service to /usr/lib/systemd/system/mariadb.service.
MariaDB is active.
NOTE: RUNNING ALL PARTS OF THIS SCRIPT IS RECOMMENDED FOR ALL MariaDB
SERVERS IN PRODUCTION USE! PLEASE READ EACH STEP CAREFULLY!
In order to log into MariaDB to secure it, we’ll need the current
password for the root user. If you’ve just installed MariaDB, and
you haven’t set the root password yet, the password will be blank,
so you should just press enter here.
Enter current password for root (enter for none):
#输入当前root密码,此处直接按enter
OK, successfully used password, moving on…
Setting the root password ensures that nobody can log into the MariaDB
root user without the proper authorisation.
Set root password? [Y/n] Y
#是否设置root密码?此处输入Y
New password:
#此处需要输入mariadb数据库root账户的密码
Re-enter new password:
#此处需要再次输入mariadb数据库root账户的密码,必须和第一次密码一致
Password updated successfully!
Reloading privilege tables…
… Success!
By default, a MariaDB installation has an anonymous user, allowing anyone
to log into MariaDB without having to have a user account created for
them. This is intended only for testing, and to make the installation
go a bit smoother. You should remove them before moving into a
production environment.
Remove anonymous users? [Y/n] Y
是否删除anonymous用户,此处输入Y
… Success!
Normally, root should only be allowed to connect from ‘localhost’. This
ensures that someone cannot guess at the root password from the network.
Disallow root login remotely? [Y/n] Y
是否禁止root用户远程登录,此处输入Y
… Success!
By default, MariaDB comes with a database named ‘test’ that anyone can
access. This is also intended only for testing, and should be removed
before moving into a production environment.
Remove test database and access to it? [Y/n] Y
是否删除测试数据库和相关权限,此处输入Y
- Dropping test database…
… Success! - Removing privileges on test database…
… Success!
Reloading the privilege tables will ensure that all changes made so far
will take effect immediately.
Reload privilege tables now? [Y/n] Y
是否重新加载权限表,此处输入Y
… Success!
Cleaning up…
All done! If you’ve completed all of the above steps, your MariaDB
installation should now be secure.
Thanks for using MariaDB!
success
#此处说明mariadb安装成功
Enter the password of the root user of the MariaDB again:
Set the password of the x2openEuler user for MariaDB:
If the selected database already exists, it will be overwritten.
Use default x2openEulerDb database? [Y/n] (default: Y)
#是否使用x2openEulerDb作为默认数据库,此处直接回车即可。
MariaDB is configured successfully.
#mariadb配置成功。
#-----------------------------安装mariadb结束--------------------------------
#-----------------------------服务初始化开始----------------------------------
If authentication is enabled,
the SSH connection fails after the fingerprint of the machine changes.
Please confirm whether public key authentication is not required for SSH connection(y/n default: n):
#确认ssh连接是否需要用到公钥认证,默认为n,这里是使用密码认证,此处直接回车即可。
Start Nginx service and Gunicorn service
Ip address list:
sequence_number ip_address device
[1] 192.168.137.11 ens33
Enter the sequence number of listed ip as web server ip(default: 1):
#确认web端ip,此处只有一个ip,直接回车即可。
Set the web server IP address 192.168.137.11
Please enter HTTPS port(default: 18082):
The HTTPS port 18082 is valid. Set the HTTPS port to 18082 (y/n default: y): #输入https服务端口,默认18082,此处直接回车即可。
Set the HTTPS port 18082
Please enter gunicorn port(default: 18080):
The GUNICORN port 18080 is valid. Set the GUNICORN port to 18080 (y/n default: y): #输入GUNICORN服务端口,默认为18080,此处直接回车即可。
Set the GUNICORN port 18080
The Nginx and Gunicorn ports are set up successfully.
Installing the django dependent environment.
The django dependency environment is installed successfully.
Generating the Django secret key.
Generate the Django secret key successfully.
Migrations for ‘certificatemanager’:
/usr/local/x2openEuler/portal/src/certificatemanager/migrations/0001_initial.py
- Create model CertificateInfo
- Create model CertPathConfig
- Create model ScheduleTask
Migrations for ‘config’:
/usr/local/x2openEuler/portal/src/config/migrations/0001_initial.py
- Create model RollbackFilterConfig
- Create model UserConfig
Migrations for ‘operationlogmanager’:
/usr/local/x2openEuler/portal/src/operationlogmanager/migrations/0001_initial.py
- Create model OperationLog
Migrations for ‘taskmanager’:
/usr/local/x2openEuler/portal/src/taskmanager/migrations/0001_initial.py
- Create model Node
- Create model Repo
- Create model Report
- Create model SoftwareAssessment
- Create model Step
- Create model Task
- Create model SoftwareAssessmentReport
Migrations for ‘usermanager’:
/usr/local/x2openEuler/portal/src/usermanager/migrations/0001_initial.py
- Create model User
- Create model FailedLogin
- Create model LockedIp
- Create model UserExtend
Migrations for ‘weakpasswordmanager’:
/usr/local/x2openEuler/portal/src/weakpasswordmanager/migrations/0001_initial.py
- Create model WeakPassword
Operations to perform:
Apply all migrations: auth, certificatemanager, config, contenttypes, operationlogmanager, sessions, taskmanager, usermanager, weakpasswordmanager
Running migrations:
Applying contenttypes.0001_initial… OK
Applying contenttypes.0002_remove_content_type_name… OK
Applying auth.0001_initial… OK
Applying auth.0002_alter_permission_name_max_length… OK
Applying auth.0003_alter_user_email_max_length… OK
Applying auth.0004_alter_user_username_opts… OK
Applying auth.0005_alter_user_last_login_null… OK
Applying auth.0006_require_contenttypes_0002… OK
Applying auth.0007_alter_validators_add_error_messages… OK
Applying auth.0008_alter_user_username_max_length… OK
Applying auth.0009_alter_user_last_name_max_length… OK
Applying auth.0010_alter_group_name_max_length… OK
Applying auth.0011_update_proxy_permissions… OK
Applying auth.0012_alter_user_first_name_max_length… OK
Applying certificatemanager.0001_initial… OK
Applying config.0001_initial… OK
Applying operationlogmanager.0001_initial… OK
Applying sessions.0001_initial… OK
Applying taskmanager.0001_initial… OK
Applying usermanager.0001_initial… OK
Applying weakpasswordmanager.0001_initial… OK
Installed 1 object(s) from 1 fixture(s)
Installed 1 object(s) from 1 fixture(s)
Installed 13 object(s) from 1 fixture(s)
Installed 52 object(s) from 1 fixture(s)
Installed 2 object(s) from 1 fixture(s)
Encrypting phase successfully.
It may take a few minutes to generate the certificate, please wait…
Certificate generated successfully. You can import the root certificate to the browser to mask security alarms when you access the tool. The root certificate is stored in /usr/local/x2openEuler/portal/thirdapp/nginx-install/webui/ca.crt.
Web console is now running, go to: https://192.168.137.11:18082/x2openEuler/#/login
#出现web访问链接则说明服务初始化成功。
#----------------------------服务初始化结束----------------------------------注意:此时我们可以通过浏览器访问https://192.168.137.11:18082/x2openEuler/#/login来设置管理员密码。
谢谢 我去尝试一下
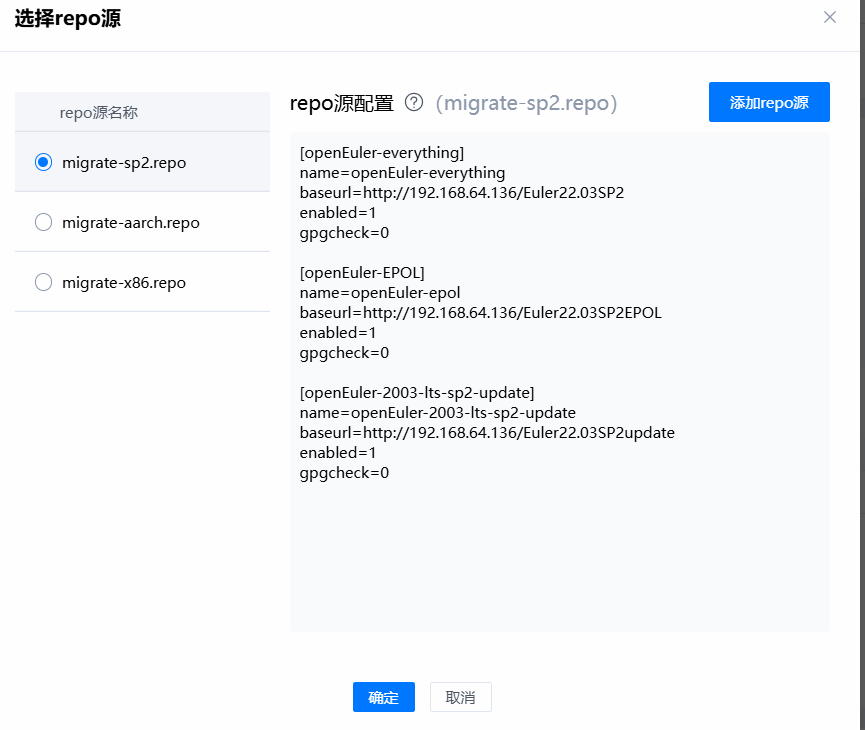
应该是repo源的问题,先看你的源能手工升级软件不,可以的话,再进行软件操作
redhat更换centos的源没试过,看了一下网上,看到要把redhat的yum删除,再安装centos的yum
我试试看看
自己手工yum安装程序试一下看正常不?
我尝试了两种都不行:
通过centos的源更新了redhat7的yum,检测没过;通过rpm卸载了yum,再rpm安装了centos的yum包也不行,检测没通过
我是说在待升级的机器上运行,类似yum install XXXX 这种命令,看你能不能正常使用
这个是正常的,我可以yum -y update yum来安装centos的yum版本,安装其他软件也是可以的
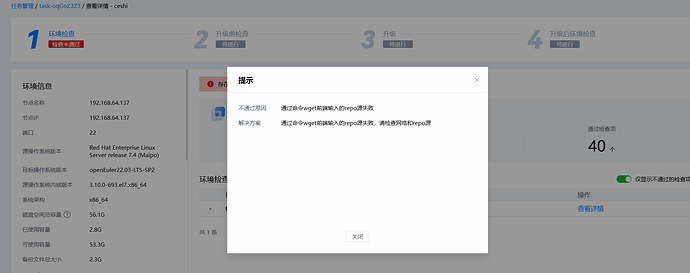
那wget呢
你得空试一下在线的源看看,我没试内网的
